Flutter splash screen :
Flutter splash screen appears as the first screen when you open the app, there we can display a image, video or animation file.
Mean while app data can be loaded on backend and make user ready to utilize the app services by making use of the time available in splash.
Splash screen is a optional screen but its a better practice to add it to the app to also promote your brand on every app you provide.
You can add video’s, stylish animations which provide some extra information regarding to your app, or just display your app logo with any animation.
Popular social networking app like facebook provide a splash screen on its every app like facebook, whatsapp, instagram, messenger and more so that user’s can know its being powered by facebook.
Flutter splash screen Video Tutorial :
Explore the tutorial below for a comprehensive guide on implementing splash screens.
Flutter splash screen Project Structure :
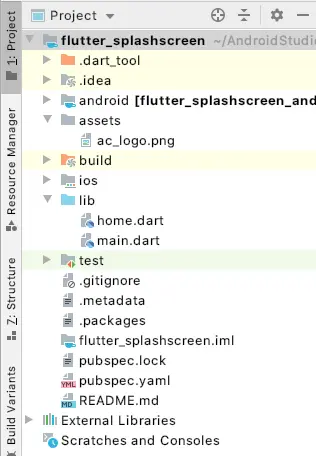
The following image illustrates the project structure for a splash screen.

pubspec.yaml :
Include an image to be shown in the splash screen within the assets folder.
assets:
   - ac_logo.webp
main.dart :
Start with the initialization using void main() and consider using the default class MyApp()
void main() {
  runApp(MyApp());
}
create a state in our stateful widget
class SplashScreen extends StatefulWidget {
  @override
  State<StatefulWidget> createState() {
    return SplashScreenState();
  }
}
Make use of a Future.delayed and provide a time duration so that a task is performed after the lapsing of time interval, here we can provide duration in terms of hours, minutes, seconds and more…
But based on the current context we need small time periods so we use seconds and then route the user to next screen.
Future.delayed(Duration(seconds: 8), () {
  Navigator.push(
    context,
    MaterialPageRoute(
      builder: (context) => HomeScreen(),
    ),
  );
});
We are trying to display a image till the timer interval is running this image is loaded from assets with specified width and height.
child: Image.asset('assets/ac_logo.webp',width: 300,height: 300)
import 'package:flutter/material.dart';
import 'dart:async';
import 'package:flutter_splashscreen/home.dart';

void main() {
  runApp(MyApp());
}

class MyApp extends StatelessWidget {
  @override
  Widget build(BuildContext context) {
    return MaterialApp(
      home: SplashScreen(),
    );
  }
}

class SplashScreen extends StatefulWidget {
  @override
  State<StatefulWidget> createState() {
    return SplashScreenState();
  }
}

class SplashScreenState extends State<SplashScreen> {
  @override
  void initState() {
    super.initState();
    Future.delayed(Duration(seconds: 8), () {
      Navigator.push(
        context,
        MaterialPageRoute(
          builder: (context) => HomeScreen(),
        ),
      );
    });
  }

  @override
  Widget build(BuildContext context) {
    return Scaffold(
      backgroundColor: Colors.white,
      body: Center(
        child: Image.asset('assets/ac_logo.webp', width: 300, height: 300),
      ),
    );
  }
}
home.dart :
We move to a new screen home from splash screen after a duration of 8 seconds is completed where we display a sample text
children: <Widget>[
  Text("Home Screen"),
],
import 'package:flutter/material.dart';

class HomeScreen extends StatelessWidget {
  @override
  Widget build(BuildContext context) {
    return Scaffold(
      body: Center(
        child: Column(
          mainAxisAlignment: MainAxisAlignment.center,
          children: <Widget>[
            Text("Home Screen"),
          ],
        ),
      ),
    );
  }
}
Flutter splash screen output :
This screen demonstrates the utilization of Flutter splash screens.
 If you have any questions, feel free to drop them in the comments below. If you enjoyed this tutorial, show us some love by liking and sharing for more exciting updates
