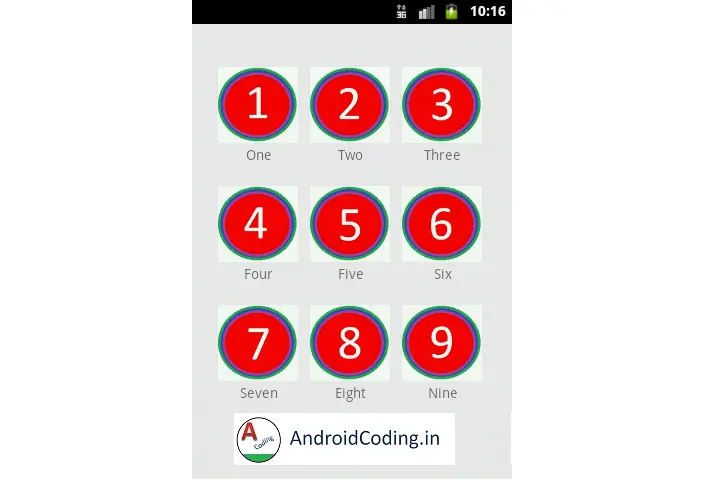
Android Gridview :
Android Gridview is generally used to represent data in form of grids, i.e., rows and columns, in list view we can display any number of rows but when it comes to displaying both rows and columns we use grid view.
Generally in gallery we see grid views and shopping apps where products are shown using a android grid view And again we can use make a customized grid view where we can place a simple image or image with text and description so on…
In this tutorial i will be showing a Android GridView with and image view and simple description text.

Now let’s start making our First Activity
Adding images and description in form of string array’s so that this will get displayed in form of grid view.This is the perfect way to populate list and gridview.
MainActivity.java :
Now we will initialize a Grid View provide data, images in the form of a array list. Assign a Android Gridview Adapter.Here in this example we are trying to tap on the gridview.
And we will try to tap on the GridView then providing a Toast based on the position.
public class MainActivity extends Activity {

	GridView grid;
    String[] num = { "One", "Two", "Three", "Four", "Five",
    "Six", "Seven", "Eight", "Nine"} ;
    int[] images = {R.drawable.one,R.drawable.two,
    		R.drawable.three,R.drawable.four, R.drawable.five,
            R.drawable.six,R.drawable.seven,R.drawable.eight,
            R.drawable.nine};

    @Override
    protected void onCreate(Bundle savedInstanceState) {
        super.onCreate(savedInstanceState);
        setContentView(R.layout.activity_main);

        GridViewAdapter adapter =
        	new GridViewAdapter(MainActivity.this, num, images);
        grid=(GridView)findViewById(R.id.gridview);
         grid.setAdapter(adapter);
         grid.setOnItemClickListener(new AdapterView.OnItemClickListener() {

               @Override
                public void onItemClick(AdapterView parent, View view,
                              int position, long id) {
                  Toast.makeText(MainActivity.this,
                  "selected number is "+ num[+ position],
                  		Toast.LENGTH_SHORT).show();

                    }
                });

    }
activity_main.xml
Add a Android Gridview to the layout file and add a id to make use of the GridView into the code.
<LinearLayout xmlns:android="http://schemas.android.com/apk/res/android"
    xmlns:tools="http://schemas.android.com/tools"
    android:id="@+id/LinearLayout1"
    android:layout_width="match_parent"
    android:layout_height="match_parent"
    android:orientation="vertical"
    tools:context="com.androidcoding.gridview.MainActivity" >

    <GridView
        android:id="@+id/gridview"
        android:layout_width="fill_parent"
        android:layout_height="fill_parent"
        android:columnWidth="50dp"
        android:gravity="center"
        android:numColumns="3"
        android:stretchMode="columnWidth" >

    </GridView>

</LinearLayout>
Now design grid view i.e., what are the components to be displayed in list view i am using a image view and and one text view.
layout_grid.xml :
Now we are designing a grid view row file as below we are just making use of the ImageView.You can also add few components like textview to display a name on the grid.
<?xml version="1.0" encoding="utf-8"?>
<LinearLayout xmlns:android="http://schemas.android.com/apk/res/android"
    android:layout_width="match_parent"
    android:layout_height="match_parent"
    android:orientation="vertical" >

    <ImageView
        android:id="@+id/imageView"
        android:layout_width="80dp"
        android:layout_height="80dp"
        android:layout_marginLeft="5dp"
        android:layout_marginRight="5dp"
        android:layout_marginTop="20dp"
        android:src="@drawable/ic_launcher" />

    <TextView
        android:id="@+id/textView"
        android:layout_width="wrap_content"
        android:layout_height="wrap_content"
        android:text="TextView"
        android:layout_gravity="center" />

</LinearLayout>
Android Gridview Adapter :
Here comes our Android Gridview Adapter where we can set the data into grid view.You can also make use of RecyclerView Adapter for Gridview to populate the information.
GridViewAdapter.java :
Inside the Android Gridview adapter we are trying to assign the data to the image view as stated below.
public class GridViewAdapter extends BaseAdapter{
    private Context context;
    private final String[] num;
    private final int[] Imageid;

      public GridViewAdapter(Context c,String[] num,int[] Imageid ) {
    	  context = c;
          this.Imageid = Imageid;
          this.num = num;
      }

      @Override
      public int getCount() {
          // TODO Auto-generated method stub
          return num.length;
      }

      @Override
      public Object getItem(int position) {
          // TODO Auto-generated method stub
          return null;
      }

      @Override
      public long getItemId(int position) {
          // TODO Auto-generated method stub
          return 0;
      }

      @Override
      public View getView(int position, View convertView, ViewGroup parent) {
          // TODO Auto-generated method stub
          View grid;
          LayoutInflater inflater = (LayoutInflater) context
              .getSystemService(Context.LAYOUT_INFLATER_SERVICE);

          if (convertView == null) {

              grid = new View(context);
              grid = inflater.inflate(R.layout.layout_grid, null);
              TextView textView = (TextView) grid.findViewById(R.id.textView);
              ImageView imageView = (ImageView)grid.findViewById(R.id.imageView);
              textView.setText(num[position]);
              imageView.setImageResource(Imageid[position]);
          } else {
              grid = (View) convertView;
          }

          return grid;
      }
Android Gridview Output :
This screen depicts the implementation of Android Gridview.

If you have any queries in this tutorial on Gridview post your comments below.
Like and share this tutorial if you like it for more interesting tutorials.
