Android MySQL Database :
We generally deal with different types of applications where there is a usage for inserting data into MySQL database and retrieving it. Let’s see more details on Android Insert Details MySQL Database.
It involves a insertion of data, retrieval, updating and some times even deleting all these operations we do in any app for example consider facebook.
In facebook if you make a post it gets inserted there in db, and edit the status it gets updated, and when searching for a friends post it comes under retrieval and finally deleting your post is deleting process.
We never notice all these changes in foreground as they are done in background which the user noway even have an idea.So, today lets go on with this tutorial and see how the server process works out.
So today i want to show you how to insert values into server in this tutorial on Android Insert Details MySQL Database.
Android MySQL Database Video :
Android Insert Details MySQL Database
Right from basic level we will see how to make php files and also database. Lets start it by creating a database in MYSQL
CREATE TABLE `acdetails` (
  `id` int(10) NOT NULL AUTO_INCREMENT,
  `name` varchar(30) NOT NULL,
  `country` varchar(30) NOT NULL,
  `email` varchar(50) NOT NULL,
  `hobbies` varchar(100) NOT NULL,
  PRIMARY KEY (`id`)
) ENGINE=InnoDB DEFAULT CHARSET=latin1
Now we will see how to code in php to insert details into database but before to that we will connect out code to database with a connector file. Php folder format AndroidCoding –> dbconnect.php, input.php (folder name) (php files)
dbconnect.php
<?php

 define('HOST','localhost');
 define('USER','root');
 define('PASS','');
 define('DB','listview');

 $con = mysqli_connect(HOST,USER,PASS,DB) or die('Unable to Connect');

 ?>
Now using this file we will connect our php file.
input.php
<?php

  require_once('dbconnect.php');

  $con = mysqli_connect(HOST,USER,PASS,DB);

  $name = $_POST['name'];
  $country = $_POST['country'];
  $email = $_POST['email'];
  $hobbies = $_POST['hobbies'];

  $sql = "insert into ACDetails (name, country, email, hobbies) values ('$name','$country','$email','$hobbies')";

  if(mysqli_query($con,$sql)){
      echo 'success';
    }
    else{
      echo 'failure';
    }
    mysqli_close($con);

?>
activity_main.xml
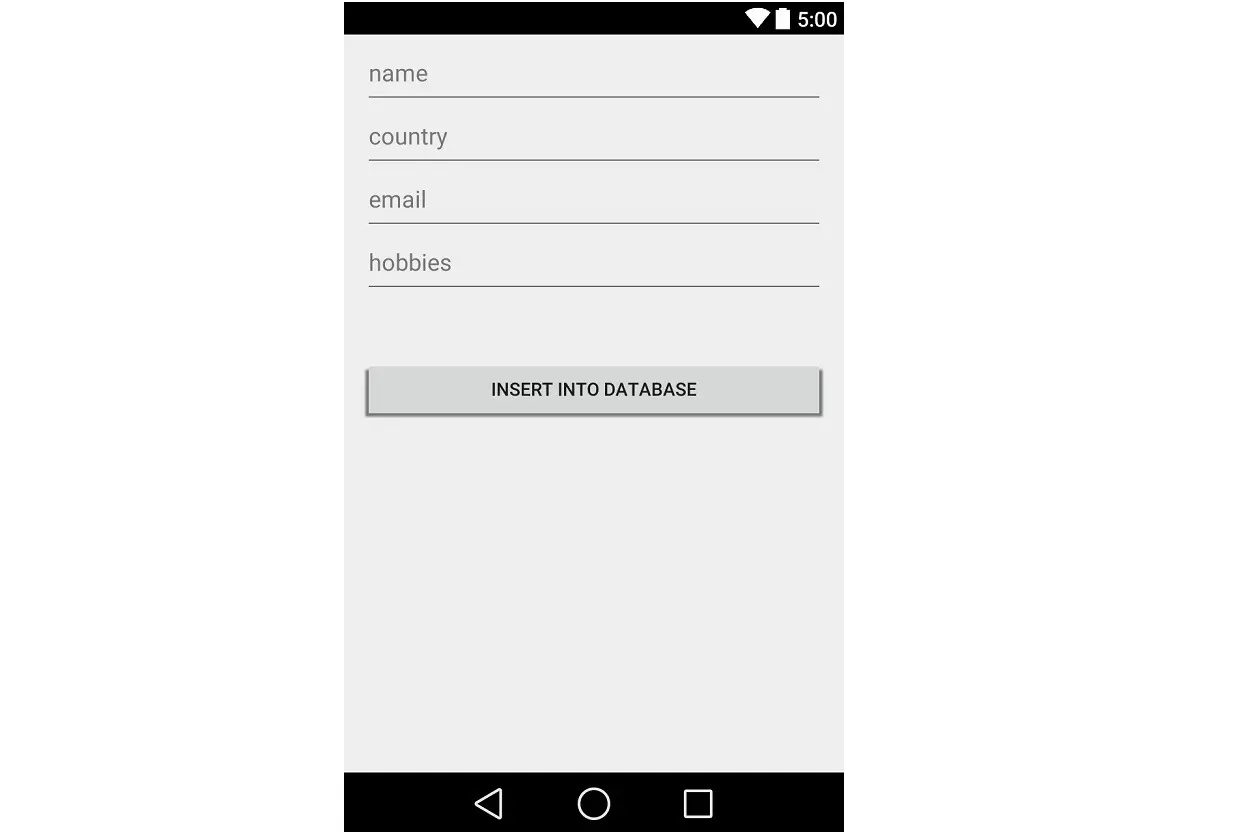
Now we will design a view where user will input details like name, country, email, hobbies.And after entering details a submit button for the form needs to be done.
<?xml version="1.0" encoding="utf-8"?>

<LinearLayout xmlns:android="http://schemas.android.com/apk/res/android"
    xmlns:tools="http://schemas.android.com/tools"
    android:layout_width="match_parent"
    android:layout_height="match_parent"
    android:orientation="vertical"
    android:padding="15dp">

    <EditText
        android:layout_width="match_parent"
        android:layout_height="wrap_content"
        android:inputType="textPersonName"
        android:hint="name"
        android:id="@+id/name" />

    <EditText
        android:layout_width="match_parent"
        android:layout_height="wrap_content"
        android:inputType="text"
        android:hint="country"
        android:layout_marginTop="10dp"
        android:id="@+id/country"/>

    <EditText
        android:layout_width="match_parent"
        android:layout_height="wrap_content"
        android:inputType="textEmailAddress"
        android:hint="email"
        android:layout_marginTop="10dp"
        android:id="@+id/email"/>

    <EditText
        android:layout_width="match_parent"
        android:layout_height="wrap_content"
        android:inputType="text"
        android:hint="hobbies"
        android:layout_marginTop="10dp"
        android:id="@+id/hobbies"/>

    <Button
        android:layout_width="match_parent"
        android:layout_height="wrap_content"
        android:text="Insert Into Database"
        android:id="@+id/insert"
        android:layout_marginTop="50dp"
        android:layout_gravity="center_horizontal" />


</LinearLayout>
So now we have got database, php files for connecting and inserting now we will see java coding. Now all the details like name, country, email, hobbies into arraylist as below.
    insert.add(new BasicNameValuePair("name", nameStr));
    insert.add(new BasicNameValuePair("country", countryStr));
    insert.add(new BasicNameValuePair("email", emailStr));
    insert.add(new BasicNameValuePair("hobbies", hobbiesStr));
Creating async class for inserting values into server.
public class Insert extends AsyncTask<String, Void, Boolean> {

        ProgressDialog dialog;

        @Override
        protected void onPreExecute() {
            super.onPreExecute();
            dialog = new ProgressDialog(MainActivity.this);
            dialog.setMessage("Inserting details, please wait");
            dialog.setTitle("Connecting... ");
            dialog.show();
            dialog.setCancelable(false);
        }

        @Override
        protected Boolean doInBackground(String... urls) {


            try {

                List<NameValuePair> insert = new ArrayList<NameValuePair>();
                insert.add(new BasicNameValuePair("name", nameStr));
                insert.add(new BasicNameValuePair("country", countryStr));
                insert.add(new BasicNameValuePair("email", emailStr));
                insert.add(new BasicNameValuePair("hobbies", hobbiesStr));


                    HttpClient httpClient = new DefaultHttpClient();
                    HttpPost httpPost = new HttpPost(
                            "http://10.0.3.2/AndroidCoding/input.php");
                    httpPost.setEntity(new UrlEncodedFormEntity(insert));

                    HttpResponse response = httpClient.execute(httpPost);

                    HttpEntity entity = response.getEntity();

                    return true;


                } catch (IOException e) {
                    e.printStackTrace();

                }


            return false;
        }

        protected void onPostExecute(Boolean result) {
            dialog.cancel();

            AlertDialog.Builder ac = new AlertDialog.Builder(MainActivity.this);
            ac.setTitle("Result");
            ac.setMessage("Details Successfully Inserted");
            ac.setCancelable(true);

            ac.setPositiveButton(
                    "Ok",
                    new DialogInterface.OnClickListener() {
                        public void onClick(DialogInterface dialog, int id) {
                            dialog.cancel();

                        }
                    });

            AlertDialog alert = ac.create();
            alert.show();
        }

    }
MainActivity.java
This is final full coding for Android Insert Details MySQL Database.
import android.app.AlertDialog;
import android.app.ProgressDialog;
import android.content.DialogInterface;
import android.net.ParseException;
import android.os.AsyncTask;
import android.support.v7.app.AppCompatActivity;
import android.os.Bundle;
import android.view.View;
import android.widget.Button;
import android.widget.EditText;
import android.widget.Toast;

import org.apache.http.HttpEntity;
import org.apache.http.HttpResponse;
import org.apache.http.NameValuePair;
import org.apache.http.client.ClientProtocolException;
import org.apache.http.client.HttpClient;
import org.apache.http.client.entity.UrlEncodedFormEntity;
import org.apache.http.client.methods.HttpGet;
import org.apache.http.client.methods.HttpPost;
import org.apache.http.impl.client.DefaultHttpClient;
import org.apache.http.message.BasicNameValuePair;
import org.apache.http.util.EntityUtils;
import org.json.JSONArray;
import org.json.JSONException;
import org.json.JSONObject;

import java.io.IOException;
import java.util.ArrayList;
import java.util.List;

public class MainActivity extends AppCompatActivity {

    EditText name, country, email, hobbies;

    Button insert;

    String nameStr, countryStr, emailStr, hobbiesStr;

    @Override
    protected void onCreate(Bundle savedInstanceState) {
        super.onCreate(savedInstanceState);
        setContentView(R.layout.activity_main);

        name = (EditText) findViewById(R.id.name);
        country = (EditText) findViewById(R.id.country);
        email = (EditText) findViewById(R.id.email);
        hobbies = (EditText) findViewById(R.id.hobbies);

        insert = (Button) findViewById(R.id.insert);

        insert.setOnClickListener(new View.OnClickListener() {
            @Override
            public void onClick(View v) {

                nameStr = name.getText().toString();
                countryStr = country.getText().toString();
                emailStr = email.getText().toString();
                hobbiesStr = hobbies.getText().toString();

                new Insert().execute();
            }
        });
    }

    public class Insert extends AsyncTask<String, Void, Boolean> {

        ProgressDialog dialog;

        @Override
        protected void onPreExecute() {
            super.onPreExecute();
            dialog = new ProgressDialog(MainActivity.this);
            dialog.setMessage("Inserting details, please wait");
            dialog.setTitle("Connecting... ");
            dialog.show();
            dialog.setCancelable(false);
        }

        @Override
        protected Boolean doInBackground(String... urls) {


            try {

                List<NameValuePair> insert = new ArrayList<NameValuePair>();
                insert.add(new BasicNameValuePair("name", nameStr));
                insert.add(new BasicNameValuePair("country", countryStr));
                insert.add(new BasicNameValuePair("email", emailStr));
                insert.add(new BasicNameValuePair("hobbies", hobbiesStr));


                    HttpClient httpClient = new DefaultHttpClient();
                    HttpPost httpPost = new HttpPost(
                            "http://10.0.3.2/AndroidCoding/input.php"); // link to connect to database
                    httpPost.setEntity(new UrlEncodedFormEntity(insert));

                    HttpResponse response = httpClient.execute(httpPost);

                    HttpEntity entity = response.getEntity();

                    return true;


                } catch (IOException e) {
                    e.printStackTrace();

                }


            return false;
        }

        protected void onPostExecute(Boolean result) {
            dialog.cancel();

            AlertDialog.Builder ac = new AlertDialog.Builder(MainActivity.this);
            ac.setTitle("Result");
            ac.setMessage("Details Successfully Inserted");
            ac.setCancelable(true);

            ac.setPositiveButton(
                    "Ok",
                    new DialogInterface.OnClickListener() {
                        public void onClick(DialogInterface dialog, int id) {
                            dialog.cancel();

                        }
                    });

            AlertDialog alert = ac.create();
            alert.show();
        }

    }

}
[/et_pb_text][et_pb_text admin_label=”Text” background_layout=”light” text_orientation=”left” use_border_color=”off” border_color=”#ffffff” border_style=”solid”]
Android MySQL Database Output :
The below image depicts the implementation of Android Insert Details MySQL Database.
If you have any query in this tutorial on Android Insert Details MySQL Database do let us know in comment section below and do like and share if you like this tutorial.


I give me a error in “Insert” class.
dialog = new ProgressDialog(MainActivity.this);
and
AlertDialog.Builder ac = new AlertDialog.Builder(MainActivity.this);
my error is “is not an enclosing class”.
please help me